|
|
Senior Connection
|
SeniorConnectionTeamYavapai.com |

| Welcome | Conference & Expo | Resource Directory | Articles | Videos | Agency Sign-Up | Contact Us | |
|
|
Building a Power Point PresentationWhy a PowerPoint Presentation? A PowerPoint presentation is similar to a poster presentation, only the information is on computer slides rather than actual posters. They are usually used to accompany an oral presentation; they should enhance the oral presentation instead of serving as speaking notes. You can incorporate audio and visual media. They are often used to share information with a large group, such as at a professional conference, classroom presentations, and meetings.
The PowerPoint Presentation Outline A PowerPoint Presentation Outline is simply a layout plan reflecting your 30-minute Speakers Bureau Presentation that you have already put together. There are a couple things to consider when laying out your PowerPoint Presentation:
The problem of how much info to include on each slide depends entirely on your comfort level. Some presenters like the idea of including the minimal information on each slide, in order to hold the audiences' attention to what is being SAID, instead of what is being READ by audience. Other Presenters want to make sure that the PDF handout of their PP (PowerPoint) Presentation contains as much info as possible to be as beneficial to the attendees as it can be, with the understanding that PDF files have legs and will be passed on to others to read and benefit from. Once you decide on your level of detail of the content, it's time to move on to the structure of the PP Presentation. One of your first PP elements is to decide on a background/foreground Master Slide. This Master Slide is the slide from which all the rest of your Presentation slides will evolve. You can design your own Master, or select and modify what is called a Template slide package available free or for a fee from several suppliers. The modifications that you will have to make on
the Master include adding your Company Name and Logo, and
Slogan. Since this info will appear in all of the slides in the
Presentation, it should be large enough to see, and small enough
not to compete with your message as the slides are revealed to
your audience. Pick company colors, but nothing too flashy or
splashy - you want your audience to remember the content of your
talk, not the slide show. Using your presentation as a guide, you will want to identify each major topic and the supporting info that you will be presenting. Each topic should have its own introduction slide, followed by subsequent informational slides containing as much info as you feel comfortable giving away. There is a strong argument for simple minimalistic slides that give the attendee a good idea where you are in your talk, but not having to read so much that it interferes with listening to what you have to say. Once you get into the rhythm, you'll find it easy to transcribe your Speakers Bureau 30-Minute Presentation into PP slides that make sense and help the flow of the talk. Typically for each topic slide, there are three follow-up informational slides. Three seems to be the magic number for audience retention of your flow of thought. Another school of thought is to sprinkle relevant graphics throughout your slide set. This adds a degree of complexity to your PP presentation that must be weighed against benefit. Keep any graphics you use simple and pointedly relevant - don't make your audience spend time trying to figure out the meaning of your graphic instead of listening to what you have to say. And lastly, a Conclusion Slide needs to be generated. The most effective conclusions end on as strong a note as the presentation began. Conclusions generally finish with a call to action, a compelling story, or a memorable quote. The most important element of your concluding slide is your personal Contact and Company Information - how is it that you want folks to get in touch with you. In other words:
Some Do's and Don'ts Do
Don’t:
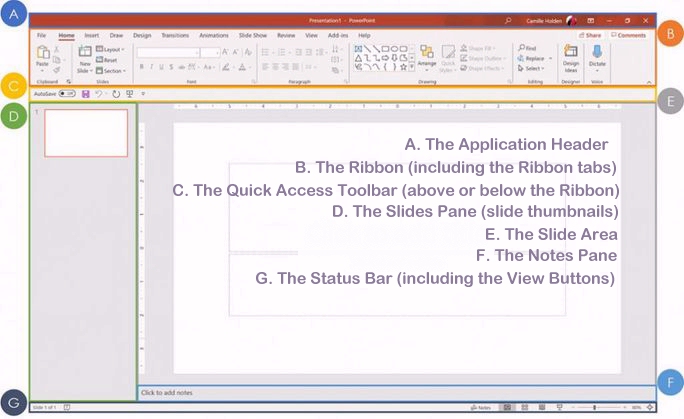
The Fundaments of PowerPoint
Step
1: Launch the PowerPoint Program Step
2: Choosing a Design Once you have more than one slide, you can add a different design for just one slide. To do this, select the slide you want to change the design on by clicking on it. It will pop-up as the big slide in the screen. Then you can right-click the design you want for this slide and select 'Apply to Selected Slide'. It will appear on that slide, but will not change the design of the other slides.
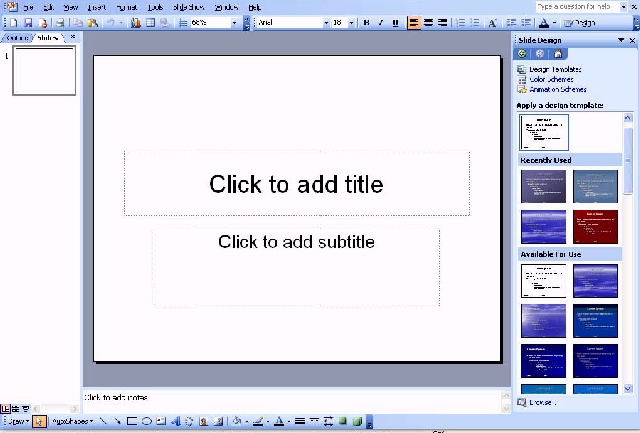
Step
3: Create Title Page Once you have your text in the boxes, you can change their font, size, color, etc. with the toolbar options at the top. You can change the size of the text box by selecting it, and then dragging the corners of the box. To move the text boxes, select the box, and move your arrow over the border of the box. A four-arrow icon will appear, and clicking with this icon will allow you to move the text boxes wherever you choose.
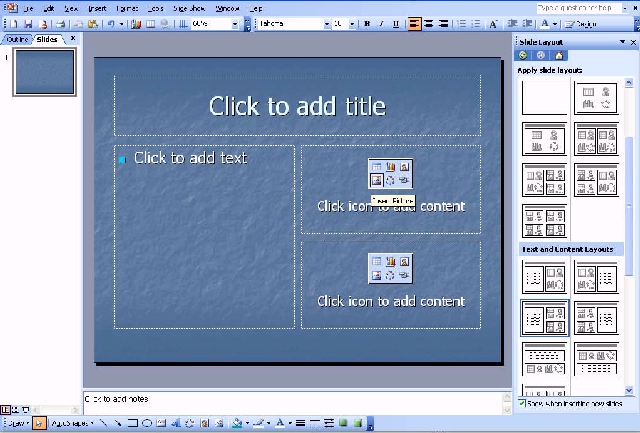
Step
4: Add More Slides The second way to add another slide it to click 'New Slide' in the toolbar above the slides. This button is divided into two parts. The top will insert a new slide with a default layout. You can also click the bottom half of this button, which will allow you to choose what type of layout you want. You can choose a slide with two text-boxes and a title, one text-box, only a title, and many other options. You will see your new slide appear to the left under the first, as well become the large slide that you can edit. The design you picked earlier will have carried over to this slide. The design will carry over for the rest of the slides you create unless you decide to change just one, like described earlier. The guideline layout you chose will appear, and you can then add in your information.
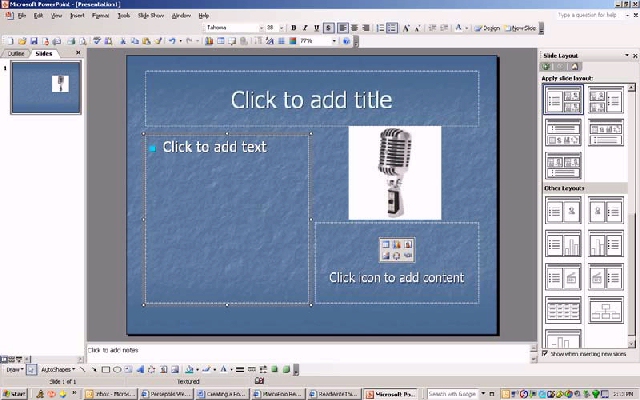
Step
5: Add Charts, Pictures, Graphs, Etc. A second way you can insert pictures and graphs is when you have an empty text or image box. Little pictures of the same options you saw in the toolbox will show up in the middle of the box, and you can click any of these to insert as well. Once you have your chart or picture, you can add a border or edit it however you want in the 'Format' tab. Step
6: Add Transitions Step
7: Changing the Order Another possibility, which is particularly useful if your presentation is longer, is to click the 'Outline' button. You can find this small button above the left area where all your slides are located smaller, directly to the right of the 'Slides' button. Here you will see a list of all your slides and you can click and drag your slides to where you want them. Step
8: Play the Presentation Congratulations! You have now made a PowerPoint presentation. See our other PowerPoint Guides to find out how to add your video narration to your slide show and How to save your PP Presentation as a MP4 video file.
|
|
The information contained herein and throughout this Senior Connection website is for educational purposes only. It is not intended, nor should it be construed as legal, medical, emotional and/or financial advice. Inclusion of companies, individuals or agencies, or their services or products, does not constitute an endorsement by SeniorConnection.us, the company, its parent corporation, its employees or interns.
© 2021, SeniorConnectionTeamYavapai.com; PO Box 11929; Prescott AZ 86304